
Many of my modification projects start life as a very much incomplete example of a common production model, usually Mamod. This is another similar case, albeit Wilesco not Mamod.
The starting point is the chassis, with no engine or boiler and little bodywork, of a Wilesco Fire Engine. Incidentaly, being based on a Wilesco chassis, I can't call it a Mamodification, so I'll have to call it something else – a Wilesconvertion, perhaps?
The chassis has been donated by a good friend, Mirko, who also offered a suggestion for something to work towards.
This was a quite common style of car in the early days of both steam and internal combustion power. In the case of steam, the boiler was often mounted under the rear seat with the engine under the chassis floor. This is the configuration which I intend to use and the Wilesco chassis is eminently suitable for adaptation in this way.
The chassis donated by Mirko has wheels, complete with steering linkage and a sprocket attached to one rear wheel; but it has no boiler or engine. These will have to be sourced; preferably (but not necessarily) Wilesco. It has one seat, which I will probably use in the forward position. The main seat and other bodywork will have to be scratch built.


The first priority was to find a suitable engine and boiler, preferably Wilesco. I worked out that an ideal combination was a Wilesco marine engine, either a D48 or D52, both of which are expensive to buy new and so I put out feelers for a cheap "scrapper". The best offer I've had so far has been a D52 in very good condition for £100. I bought this engine but I'm still of the opinion that it's too good to be hacked around and hidden inside a project. I'm still looking out for a cheaper alternative so I can keep the good one intact and add it to my collection in it's own right!

I really must pull my finger out on this project. I've been holding back hoping to find a cheap Wilesco engine to show up to use instead of the D52 I already have which is (was!) too good to hack about. However, I've given up waiting so I've jumped in at the deep end and started hacking.
I've started by sawing off one leg of the L shaped frame of the D52.

I plan on mounting it under the chassis with a two stage speed reduction, belt and chain. I've been experimenting with various confogurations and it will probably end up something like this:


The boiler will be mounted at the rear, like on the fire engine but horizontal and hidden under the rear seat. It will probably be gas fired but maybe meths?
I've mounted the engine unit in position and sorted the drive with some Meccano.


|
||


|
||


|
||


|
||
On the first attempt at a steam test, I discovered that there was a bad leak at the sight glass. On removing it I found that a previous repairer had used a self tapping screw in place of one of the bolts and this had buggered up the holes in both the boiler itself and the retaining ring. Also, the glass had been glued in place and I broke it attempting to remove it. Fitting a new glass was no problem but I had to think of a way to fit a new bolt without having to replace or do major surgery on the boiler. In the end, I decided on this fix:


It consists of a short length of brass square bar, bent to fit in the space where the nut should be. I also fitted a large washer under the bolt head (not shown in the photo). This arrangement works quite well.
Having achieved a steam-tight boiler, I was able to perform the steam test. It all worked ok except that the chain kept jamming on the sprocket and stalling the engine. Loosening the tension just caused it to jump off instead of jam. Investigation showed that the problem was the Meccano part that I had used as the small sprocket has a slightly different pitch from the Wilesco sprocket on the rear wheel. Obtaining and fitting a proper Wilesco small sprocket fixed that problem and it now works ok. A video can be seen on YouTube at:
I now have to start thinking about the bodywork.
I've made a start on the bodywork. The side sheets are stainless steel, for strength and rustproofness (is that a word? It is now!). The seat is wood, I don't know what wood it is but I know it's a "hard" wood so it won't warp if it gets a bit damp. I'll varnish it anyway when the glue's set.


The front seat is the original seat from the fire engine but relocated and with an extra bit of wood for the backrest.
A fixed aluminium sheet fills the gap under the front of the main seat. A hinged panel fabricated from a ventilation grill and more aluminium sheet hides the boiler and burner at the rear. The controls are accessible by lifting the seat.


The steering mechanism needed some modification.
|
||


The footwell floor is made from 2mm thick strips of teak obtained from Venetian blinds and donated by forum friend Phil (aka Bugsy).


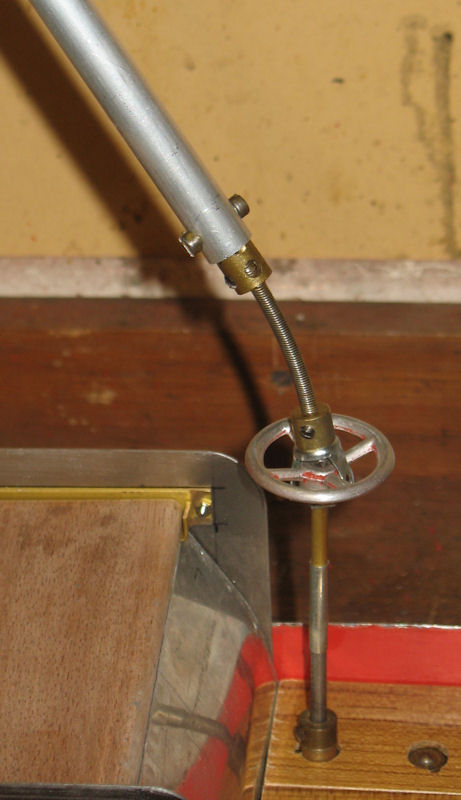
I tried using the Wilesco remote steering cable but found it to be too flexible. There's more friction in this steering gear than in the Old Smoky and I found I had to turn the top end 2-3 turns before the bottom end started turning! So I made up a rigid version with 1m of aluminium tube, some Meccano bits and a spring just at the bottom end. This is far more satisfactory:
|
||
|
||
|
||


|
||


There is now a video in YouTube:
http://youtu.be/HG3Me05xsFI
Having said “finished”, it is as far as planned but I've had suggestions for a tool box and luggage in the large space in the foot well. I think I might have some suitable bits in the junk box …
|
||


